Last weekend (1/28-29), I again made the trek up to Central California to do some backcountry skiing. I'll be honest, the skiing wasn't very good. In fact it was pretty bad. But like all difficult things, it was a formative experience and I learned a lot. The story is best told by breaking it down into lessons learned.
Lesson #1: Avoid Parking in Grandma's Front Yard: On Saturday, we were planning on skiing Red Mountain, which is located between Shaver Lake and Sierra Summit on Rt. 168. So we drove up most of the way the night before and decided to sleep in the back of John's Explorer. We parked on the side of the road around midnight and figured everything was fine. I guess we were a little close to Grandma's house because her dog got wind of us around 1:45. Grandma decided to come out and find out if we were ok. She was actually pretty cool. She had no problem with us sleeping there for the night. It just took away from the little sleep we were getting in the comfy confines of the Explorer.
Lesson #2: Bring Toilet Paper: I've gotten too used to staying in places that provide you with toilet paper and of course forgot to bring my own. So shortly after waking up, I had to go and do my business...toilet paper or no toilet paper. Unfortunately, there were no leaves on the ground and all the trees were evergreens. I decided that they wouldn't be too comfortable or effective. The best solution I came up with was to grass wrapped with an old REI receipt.
Lesson #3: Get a Hide a Key: We arrived at the Red Mountain trail snow park around 7:15. We then had breakfast and put our gear on. To keep us entertained, we had the Sirius satellite radio blasting tunes from the "Hair Nation" station. A minute later, John shut his door and realized that he had locked the keys in the car (they were still in the ignition) with the radio still on. So we were presented with a dilemma. Do we go on the ski tour or do we get the door opened? Rather than getting a professional, we decided to try and open it ourselves. Picture John standing on top on the roof of the Explorer using one of his skis as a lever to pry open the door with me trying to jam my ski pole into the opening John created in a sad attempt at hitting the automatic lock button. As expected, it was completely ineffective. I was really surprised that no one driving by stopped as it looked like we were trying to break into the car. Once we gave up on doing it ourselves, we decided to go on the tour and deal with it later.
 Lesson #4: Usefulness of GPS and an Altimeter: Neither John nor I had ever been out to Red Mountain. John had heard about it from a friend and had read a description of it on the Sierra Club Ski Mountaineer's website. But that was about all the knowledge we had. On the positive side, we did pick up a topographic map of the area. But unfortunately, none of the trails were labeled on the topographic map, the trails themselves weren't labeled very well, we were stupid and talked ourselves into taking the wrong trail. Not wanting to waste time, we decided to take what we thought was the geographic straight line to the trail we wanted to be on. We eventually made it onto the trail. But we were really never sure where we were on the map or how far we had left to go. We only realized that we were on the right trail when we reached West Lake at the base of Red Mountain. For me, the hike wasn’t the hard part. It was only 6.5 miles and the climb was very gradual. Most all of it consisted of following Snowmobile tracks. The hard part for me was the uncertainty. GPS would have obviously cleared that up. But as long as you have a topographic map, an Altimeter would also have given you a good idea of where of you were by telling you which iso line on the map you were on. (Note: This is similar to the technique we used on the sub where we would use ocean depth to fix our position.) If you want to do this tour without getting lost, just follow the signs at first for the Red Mountain trailhead and then for Red Mountain. (We errored in thinking that we were already on the Red Mountain trail as soon as we left the parking lot and that the first sign for the Red Mountain trailhead would loop us back to the parking lot)
Lesson #5: Bring Basic First Aid: About halfway into the hike, I got a pretty good sized blister on the back of my left ankle. When it first started hurting, it made me wish that I would have brought some mole skin with me. Luckily, John had a role of duct tape, which turned out to be an excellent temporary fix. We made a small duct tape square by putting folding one strip of duct tape in half (sticky side to sticky side). We put this against the blister and then taped that to my foot. So now you know one more use of duct tape. Despite the fact that this wasn't very serious, it did make me think about what I would do if something more serious happened. In the future, I'll definitely bring a basic first aid kit along with me and I might take a wilderness first aid course.
Lesson #6: The Skiing at Red Mountain is not worth the hike: Even if you don’t get lost, it’s a 5 mile hike to get to the top of the mountain. So it’s not easy to get to. The west facing ridge has a nice steep 400 ft vertical ridge. But it’s west facing. The north facing bowl we heard so much had a nice rocky steep section that last for about 30 vertical feet. It was followed by several hundred vertical feet of boring low grade crap. The snow at the top was very wind packed and slick while we did find some powder in the woods below.
The trip back to the car was easy. It took us 1.5 hours. Its not all downhill. So you’ll either have to put your skins back on or carry them like we chose to do. Thanks to the grumpy front desk guy at the Tamarack Lodge (just up 168 from the snow park), we were able to get AAA to send someone out to open the Explorer up for us. Amazingly, the battery was still full of juice with the radio going at full blast all day.
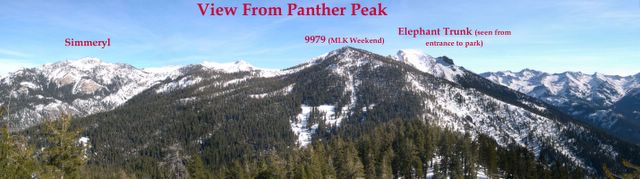
The next day, we skied Panther Peak at Sequoia National Park. The tour leaves from the Wolverton parking lot (just like 9979 which we did over MLK weekend). You just follow the yellow trail markers and it will guide you there. It only took us about 2 hours to reach the summit. The skin up was made easier by following John’s skin track from when he went up the previous weekend. The run down Panther Peak gives you about 700 vertical feet of low grade, north facing trees. The first 100 feet at the top is more exposed and we found it to have a very heavy crust. While not great snow down below, we had about 8” of heavy, creamy powder. You definitely had to have some speed to help you turn in it. But it was fun! By the time we went up for a second lap, it had warmed up substantially. This caused the snow to stick to our skins. In the future, I’ll be sure spray some of the Black Diamond Free Glide spray onto it the night before. Since we didn’t spray it on the night before, we used some Globstopper wax. While not totally fixing the problem, it at least allowed us to make it back up for a second run.